TransLogger
Contents.
1. Connection to your autoclave.
2. Recording cycle data.
3. Downloading and auto-organizing cycle logs.
4. The TransLogger software interface.
5. Retreiving cycle logs.
6. Resetting your TransLogger.
7. Uploading to Gmail
8. Restoring accidentally erased configuration files
9. Upgrading to WiFi for SteriReader.
1. Connection to your autoclave.
Your TransLogger will come with a cable which is specific to your particular autoclave.
Some autoclaves may need their settings changed, to enable recording.
Click on one of the brand names below to see a how-to video about connecting your TransLogger to your autoclave and changing settings, if required.
Midmark M9 / M11
Midmark M3
Statim 2000 / 5000 (older models)
Statim 2000 / 5000 G4
Bravo
Flight
Tuttnauer Elara / EZ+
Tuttnauer 10k (older model)
Miele
StatClave G4
Pelton & Crane
Lisa
The large white end clips into the back of your TransLogger and will lock in place. You can remove this end of the cable by pushing up on the locking tab, from the bottom.
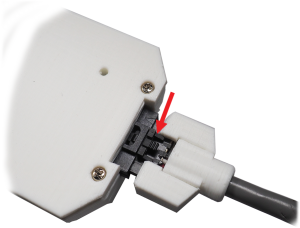
Once connected and/or powered-up, your TransLogger will beep 2x and the screen on your TransLogger will indicate that the uSD card is (”SD in”) and it has the proper configuration files (”SD OK”). Always use the uSD card included with your TransLogger; other uSD cards will cause the TransLogger not to work. For wrong uSD cards, the screen will display “Wrong SD” and the TransLogger will freeze. Insert the proper uSD card and reset by un- and re-plugging its cable.
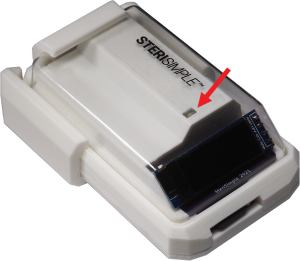
Affix the cradle to your autoclave with foam mounting tape and slide your TransLogger into place. For Midmark autoclaves, place the cradle well away from the steam that is released as the door opens.
** It is excellent practice to disconnect your TransLogger from power at the end of the week. **
2. Recording cycle data.
Your TransLogger will automatically record cycle data to a file on the uSD card as a cycle starts.
When a new cycle starts, your TransLogger will quickly beep 3x. This is its characteristic “start beep.”
The cycle number will be displayed on the TransLogger screen.
There is a white indicator light on the top of the TransLogger that will gently flash as data is received and written to the file.
At the end of a cycle, your TransLogger will again quickly beep 3x. This is its characteristic “end beep.”
The cycle number will remain on the screen until the next cycle begins.
Cycle log files are stored on the uSD card as consecutively numbered text files (eg, 01.txt, 02.txt).
3. Downloading and auto-organizing cycle logs.
Click the Download TransLogger software button at the top of this page to download and install the TransLogger file organizing software.
Activate the installer and follow its prompts during installation.
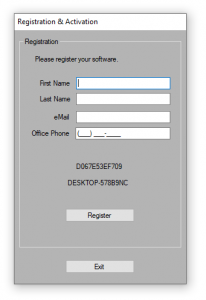
You will be prompted to register the software at first start-up. Please fill in the registration form and click Register.
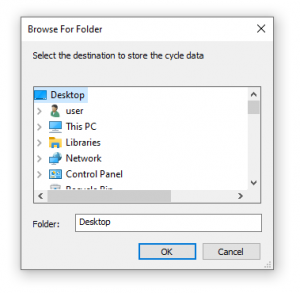
You will be prompted to select the destination folder to save the files; you only have to do this once. Select a folder on your Server. The software will produce a subfolder called “SteriSimple” to contain the cycle logs. You may have to ask your IT pro to include this subfolder in your regular back-up routine.
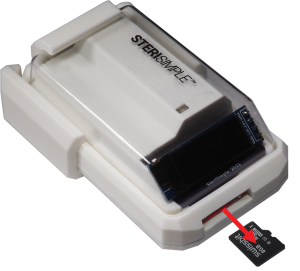
Gently remove the uSD card from your TransLogger by pushing it in with your fingernail until it clicks to release. Then, place it in the SD adapter provided and insert that into your PC.

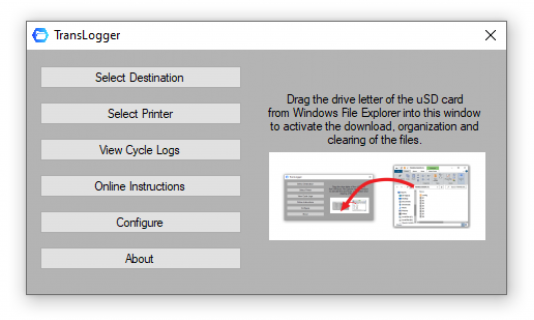
Start-up the TransLogger software. Through Windows File Explorer, drag the drive letter of the uSD into the interface.

There is a short short cut, when you don’t want to do anything else other than download the files from the uSD card: drag the drive letter of the uSD over the TransLogger icon on the desktop. It will do everything and you don’t even have to start-up the software.
In either case, the software will automatically:
a) back-up all the files on the card to a date-stamped folder in your save destination,
b) search each file for the sterilization date, then name, date-stamp and save each file,
c) upload a zipped folder of the downloaded cycle logs to email, if this function is enabled (see Section 7),
d) clear the uSD card when complete.
Never attempt to manually move recorded cycle logs from the uSD into a folder on your PC and never ever remove the config folder from the uSD. Your TransLogger will simply not work any longer.
When complete, replace the uSD card into your TransLogger.
** BE CAREFUL. The uSD card is ceramic and can be damaged easily. Insert it gently and press it in until it clicks.**
4. The TransLogger software interface.
This is the user interface of TransLogger software. It is very straightforward to use. The functions are:
Select Destination: Choose where to save the cycle logs when downloaded.
Select Printer: Select the printer for hardcopies of cycle logs as you need.
View Cycle Logs: View any saved cycle log. Select the date and double-click on a file.
Online Instructions: Brings you to this page.
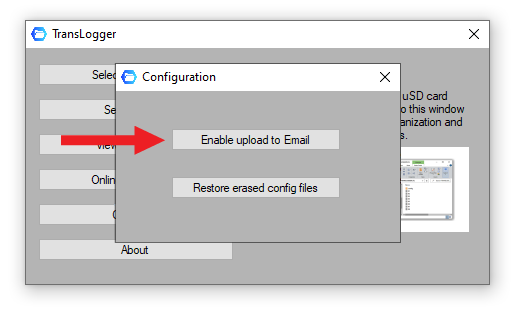
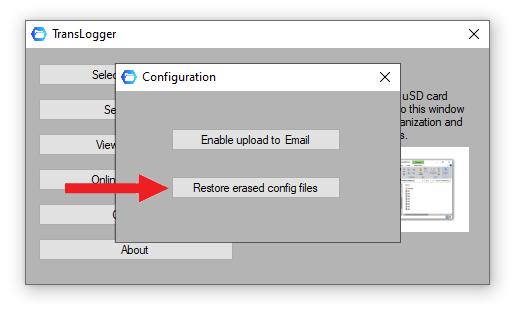
Configure: Enable upload to email, replace erased configuration files, etc.
About: This indicates the software version, etc.
5. Retrieving cycle logs.
When you open TransLogger software, click on View Cycle Logs.
Double-click on the Year, then double-click on the Month, then double-click on the day. You will see a list of all cycle logs for that day.
Double-click on a cycle log in the list to view. It will be displayed in the window on the right.
From there, you can click on Print for a hard copy.

6. Resetting your TransLogger.
On occasion, you may need to reset your TransLogger. You may decide to do so if your TransLogger does not beep 3x when a cycle starts, or if the white indicator light does not flash at any point during a cycle.
To reset your TransLogger, disconnect its cable from the rear by pushing up on the locking tab, from underneath. This will cause it to power-down.
After a few seconds, reconnect the cable. Your TransLogger should beep 2x and display “Steri Simiple” on its screen, then indicate that the uSD card is present (”SD in”) and correct (”SD OK”).
7. Uploading to Email.
There is a detailed tutorial for properly setting up a hotmail or outlook email account for this purpose. There are security settings that need to be addressed. See the tutorial here.
In the main interface, click on Configure, then select Enable upload to Email.
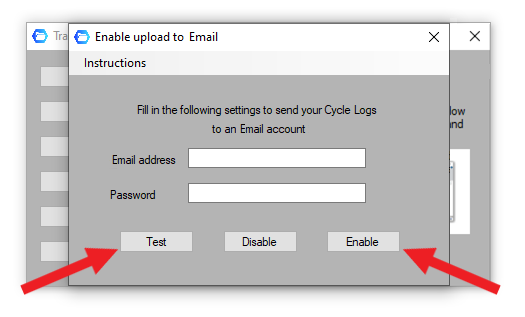
Enter your gmail address and password. To test the function, click Test. A message will appear in your Inbox, indicating successful setup.
Don’t forget to click Enable. Going forward, each time you upload cycle log files from the uSD through TransLogger software, a zip file containing those files will be sent automatically to your hotmail or outlook email account.
8. Restoring accidentally erased configuration files.
There is a detailed tutorial available for this section. See it here.
The first thing you should consider doing is backing-up the configuration files. In the main interface, click on Configure, then Restore erased config files.

From Windows File Explorer, drag the drive letter of the uSD into the TransLogger window (1). This tells the software where the uSD is.
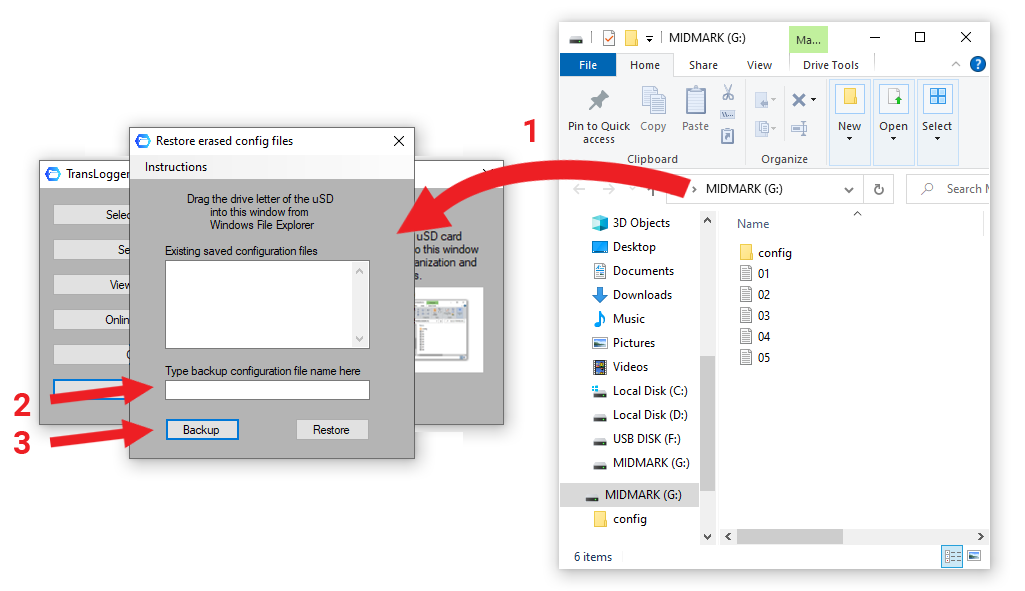
Enter a name for the back-up (2) then click Backup (3).
Eject the uSD from your PC before unplugging it.
To restore accidentally erased configuration files, which can occur only if you attempt manual file transfer from the uSD to your PC, from the main interface click Configure, then select Restore erased config files.
From Windows File Explorer, drag the drive letter of the uSD into the TransLogger window (1). This tells the software where the uSD is.
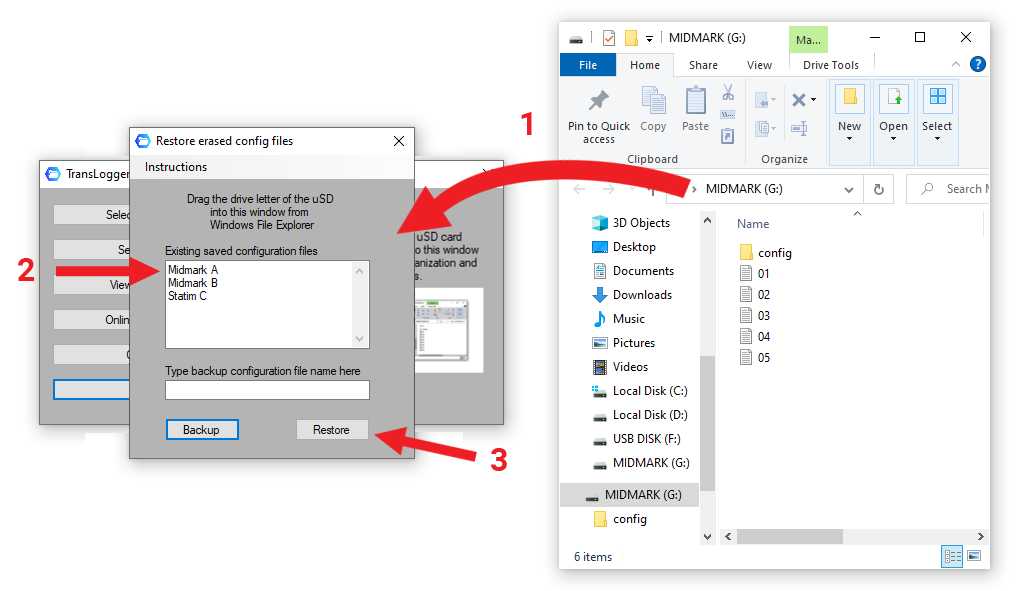
Click on an existing saved configuration file (2)and click Restore (3).
Eject the uSD from your PC before unplugging it.
9. Upgrading to WiFi for SteriReader.
Your TransLogger can be upgraded instantly for use with SteriReader automated cycle logging and label production software. We will need to upload configuration files onto the uSD card in your TransLogger to activate this added functionality.
SteriReader is powerful yet simple to use software that automates complete documentation of:
Mechanical indicators,
Chemical indicators,
Staff verification and
Load contents.
This information is saved onsite and is also transmitted instantly to the cloud. SteriReader cuts down the amount of work to mere seconds per cycle for you and your team members. SteriReader also has numerous resources available to you, such as:
Online instructions and tutorials,
IPAC and WHMIS manuals,
SDS library,
GHS labels,
Manufacturer user manuals,
Manufacturer recommended maintenance schedules,
Maintenance task logging.
SteriReader part of a proven system that is automatically documents spore testing, cycle logging and instrument tracking and recall. SteriSimple is efficient and complete. Ask about how SteriSimple protects you and your patients while saving costs and improving morale.